Strategy February 01, 2018
Edit Away Your Embroidery Issues
Even embroidery designs that sew out perfectly in a test situation will sometimes still require editing once they run on production machine.
The reality of commercial embroidery is such that digitized logos will often work perfectly in a test environment, but when it comes to production the wheels fall off the bus and edits are required.
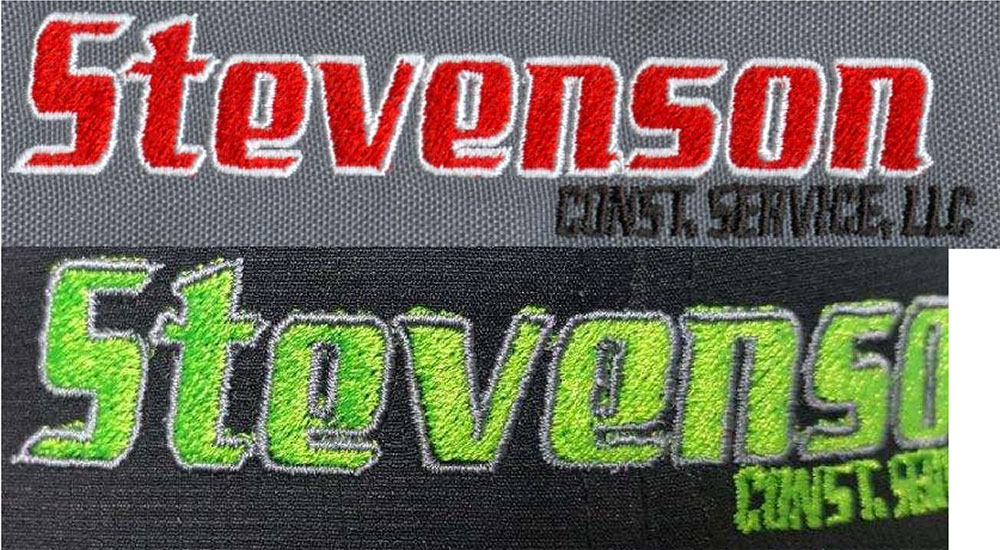
 Take a look at the two Stevenson logos pictured above. Digitized for a cap, the red-and-white version on top sewed out with no problems on a sample machine. The green logo underneath, from an embroiderer’s production machine, has clear registrations issues. The problem becomes: “How do I fix this?”
There’s more than one way to the finish line, and many times it will take more than one technique to get a design to sew perfectly. Typical hat digitizing technique requires a design be programmed to sew from the bottom up and center out. That’s exactly how this design was programmed. Then, to help with registration after embroidering the bottom text, the design embroiders the fill for the letters, “evets,” adds borders to them, and then embroiders the fill and borders for the remaining letters: “nson.”
In theory this should work great. In reality, what happens is the cap moves around in the cap frame during the embroidery process, and by the time the borders are sewn the design no longer registers properly. What to do then? There are a few different techniques that can be applied.
1. Maintain the bottom up center out programming, but border each letter immediately after it is filled. In this case, that means sew the fill on the E, then the border on the E, fill the V, add the border on the V, etc. This will add color changes, but will allow for less movement in the design and better registration.
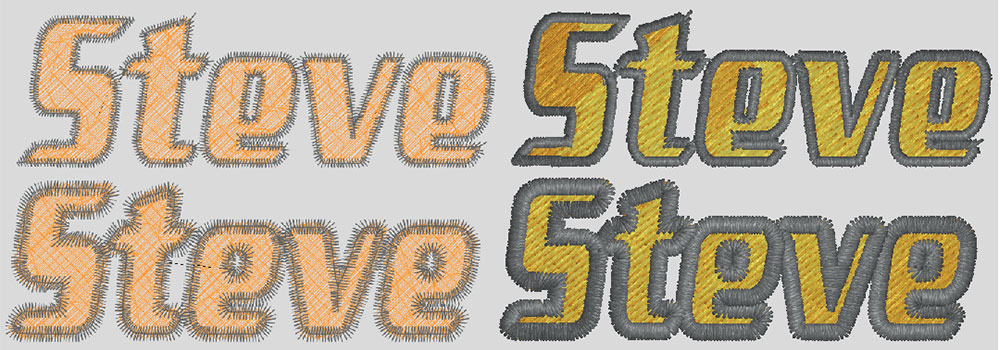
 To fix the registration issues in this case, you can increase the column width and shift the fill down and to the left. The edited version is shown below the original.
2. Add column width to the borders on the letters, which will provide a little more room for imperfection.
3. Examine the production sample carefully and make changes to the programming based on what you see. In this example, you can see that the registration issues show a consistent trend where the stitching is pulling up and to the right. This is evident because there are gaps at the bottom of the letters and stitches peeking out from the top. This can be corrected through editing by adjusting the fills so that on the bottom of the letters the fill moves closer to the outside edge of the border. At the top, bring the fill in from the outer edge. It should be noted, however, this is a trial and error process and can be frustrating.
 Once the embroidery file has been edited, it sews out in a production environment without registration issues.
The most important takeaway is this: Editing is part of the embroidery process. Even if you had the best digitizer in the world sitting in your shop, she will, from time to time, need to edit designs to make sure they run well on your machines. If you’re the digitizer, it’s critical to understand that successful editing will almost always involve using more than one technique to get you to the finish line.
***
Steve Freeman is the managing partner of Qdigitizing.com. He has been a professional digitizer since 1989 and is trained on Melco, Wilcom and Pulse software systems. Prior to Qdigitizing, he was an embroidery manager at Zazzle.com, and before that, he owned and operated a 60-head embroidery company for 15 years. You can reach him at steve.freeman@qdigitizing.com or (877) 733-4390.
